Chevrolet Sonic Repair Manual: Overview (AM-FM Radio)
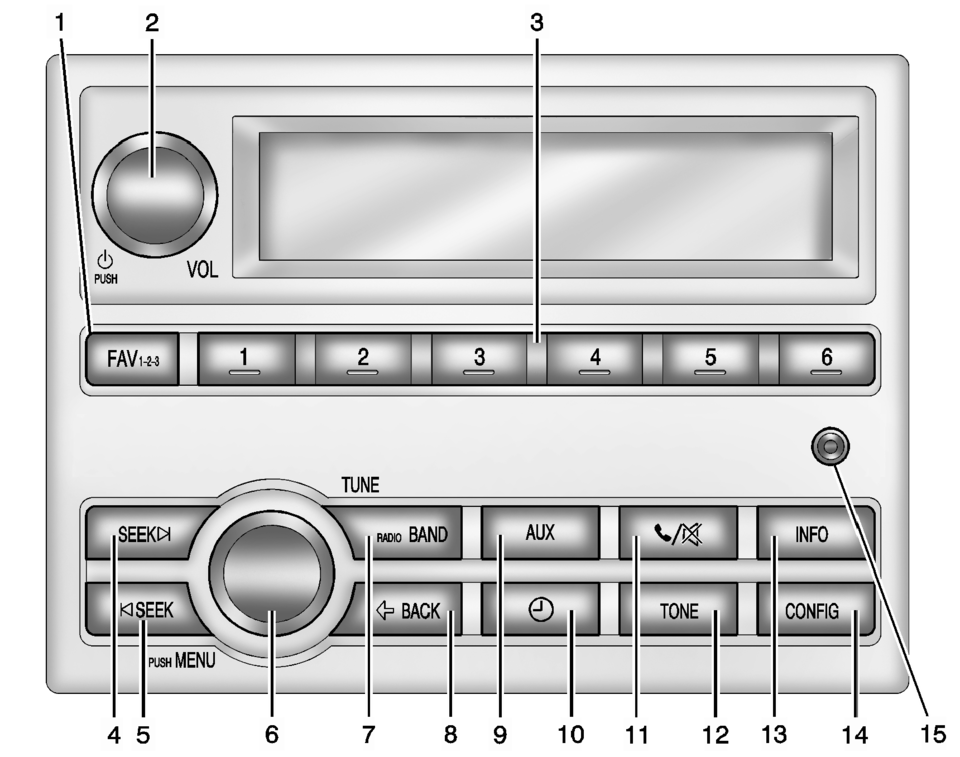
- FAV 1-2-3 (Favorites)
- Radio: Opens the favorites list.
- Turns the system on or off and adjusts the volume.
- Radio: Saves and selects favorite stations.
- Radio: Seeks the next station.
- CD: Selects the next track or fast forwards within a track.
- Radio: Seeks the previous station.
- CD: Selects the previous track or rewinds within a track.
- Radio: Manually selects radio stations.
- CD: Selects tracks.
- Changes the band while listening to the radio.
- Selects the radio when listening to a different audio source.
- Menu: Moves one level back.
- Character Input: Deletes the last character.
- Selects external audio source.
- Opens the Clock menu.
- Mutes the audio system.
- Opens the Tone menu.
- Radio: Shows available information about the current station.
- CD: Shows available information about the current track.
- Opens the Configuration menu.
- 3.5 mm (1/8 in) connection for external devices.
 Operation
Radio Controls without Touchscreen
The infotainment system is operated by using the pushbuttons, multifunction
knobs, menus shown on the display, and steering wheel controls, if equipped ...
 Overview (Radio with CD/USB)
91011121314151617
O /VOL (Power/Volume)
Turns the system on or off and adjusts the volume.
Z (Eject)
Removes a disc from the CD slot.
Buttons 1−6
Radio: Saves a ...
Other materials:
Headlining Trim Panel Replacement (Hatchback without Sunroof)
Headlining Trim Panel Replacement
Callout
Component Name
Warning: Do not attempt to repair or alter the head impact
energy-absorbing material glued to the headliner or to the garnish trims.
If the material is damaged ...
Intermediate Steering Shaft Replacement
Intermediate Steering Shaft Replacement
Callout
Component Name
Preliminary Procedure
Remove the steering column and the intermediate steering shaft as an
assembly. Refer to Steering Column Replacement.
1
...
Jump Starting
For more information about the vehicle battery, see Battery.
If the battery has run down, try to use another vehicle and some jumper cables
to start your vehicle. Be sure to use the following steps to do it safely.
Warning: Batteries can hurt you. They can be dangerous because:
The ...

0.0056