Chevrolet Sonic Repair Manual: Toe Description
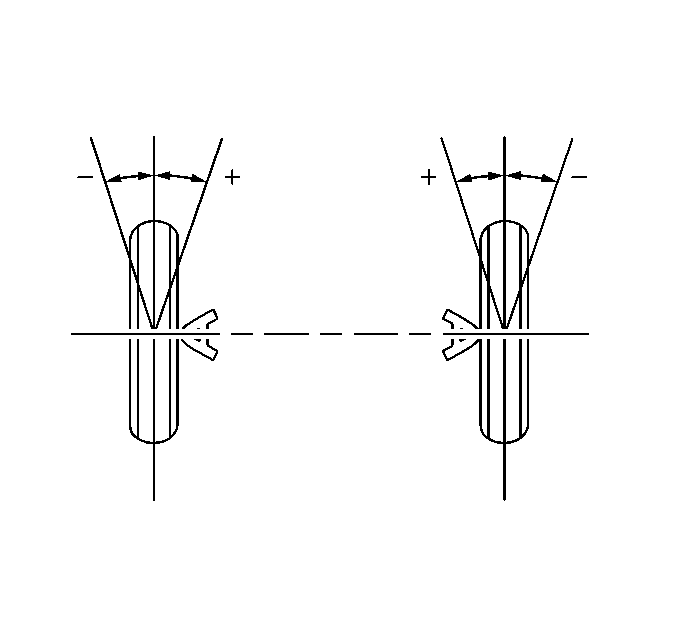
Toe is a measurement of how much the front and/or rear wheels are turned in or out from a straight-ahead position. When the wheels are turned in, toe is positive (+). When the wheels are turned out, toe is negative (−). The actual amount of toe is normally only a fraction of a degree. The purpose of toe is to ensure that the wheels roll parallel.
Toe also offsets the small deflections of the wheel support system that occur when the vehicle is rolling forward. In other words, with the vehicle standing still and the wheels set with toe-in, the wheels tend to roll parallel on the road when the vehicle is moving.
Improper toe adjustment will cause premature tire wear and cause steering instability.
 Tires and Wheels Description and Operation (Tire Identification)
Identification
Accessory and warranty replacement must use TPC spec tires.
An outboard orientation stripe is added to the tread surface, with an
offset toward the outboard tire fa ...
 Torque Steer Description
A vehicle pulls or leads in one direction during hard acceleration. A vehicle
pulls or leads in the other direction during deceleration.
The following factors may cause torque steer to be more ...
Other materials:
Toe Description
Toe is a measurement of how much the front and/or rear wheels are turned in or
out from a straight-ahead position. When the wheels are turned in, toe is positive (+).
When the wheels are turned out, toe is negative (−). The actual amount of toe is
normally only a fraction ...
Timing Belt Lower Front Cover Replacement
Timing Belt Lower Front Cover Replacement
Callout
Component Name
Preliminary Procedures
Remove the front wheelhouse liner inner front extension. Refer to
Front Wheelhouse Liner Inner Front Extension Replacement.
Remove th ...
Fuel Feed Pipe Replacement
Removal Procedure
.-
Remove the fuel feed pressure sensor. Refer to Fuel Pressure Sensor
Replacement - Fuel Feed Pipe.
Disconnect the fuel feed pipe (1). Refer to Plastic Collar Quick Connect
Fitting Service.
Remove the plastic retainer (1) ...

0.0059