Chevrolet Sonic Repair Manual: Transmission Mount Replacement - Left Side
- Removal Procedure
-
- Remove the battery tray. Refer to Battery Tray Replacement.
- Install the engine support fixture. Refer to Engine Support Fixture.
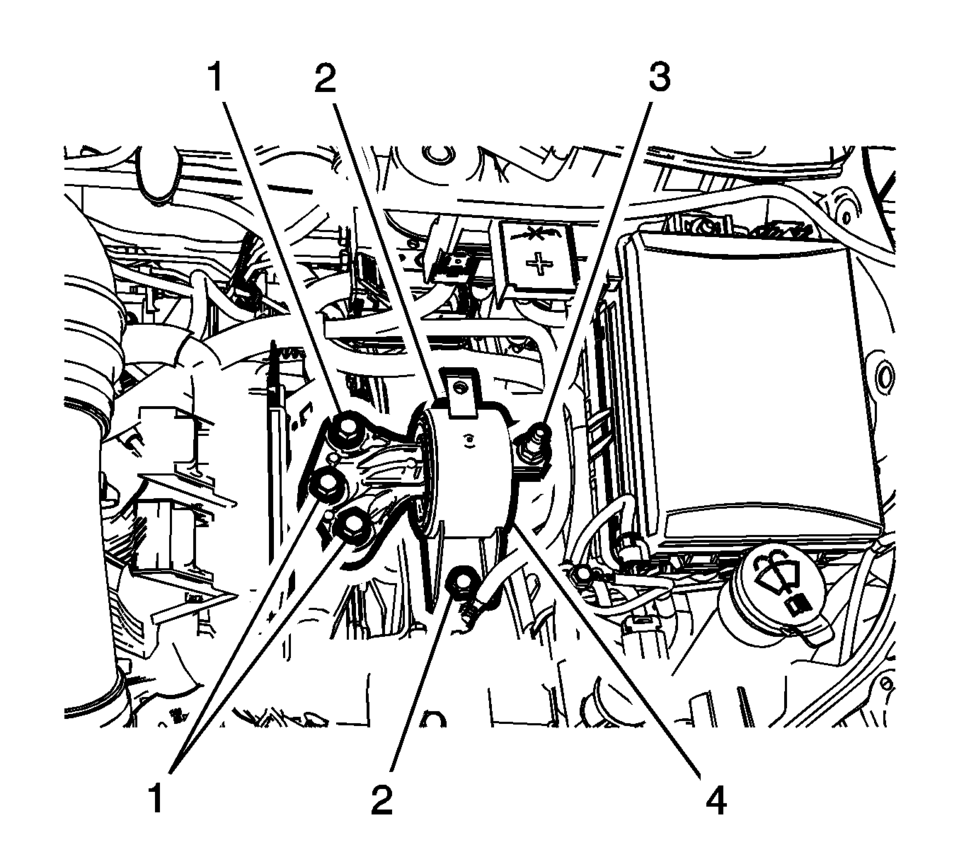
- Remove and DISCARD the left transmission mount to bracket bolts (1).
- Remove the left transmission mount to body bolts (2).
- Remove the left transmission mount to body nut (3).
- Remove the left transmission mount (4) from the vehicle.
- Installation Procedure
-
- Install the left transmission mount (4) to the vehicle.
- Install the left transmission mount to body bolts (2)
and tighten to 58 Y (43 lb ft)
.
- Install the left transmission mount to body nut (3)
and tighten to 58 Y (43 lb ft)
.
- Install the NEW left transmission mount to transmission
bolts (1) and tighten to 50 Y (37 lb ft)
plus 60?5 degrees
.
- Remove the engine support fixture. Refer to Engine Support Fixture.
- Install the battery tray. Refer to Battery Tray Replacement.
Caution:
Refer to Fastener Caution.
 Transmission Mount Bracket Replacement - Rear
Removal Procedure
Raise and support the vehicle. Refer to
Lifting and Jacking the Vehicle.
Remove the front suspension skid plate, if equipped.
Refer to Drivetrain and Front Su ...
 Transmission Rear Mount Bracket Replacement
Removal Procedure
Raise and support the vehicle. Refer to
Lifting and Jacking the Vehicle.
Remove the front suspension skid plate, if equipped.
Refer to Drivetrain and Front Su ...
Other materials:
Instrument Panel Tie Bar Replacement
Removal Procedure
Remove the Instrument panel assembly. Refer to Instrument Panel Assembly
Replacement.
Remove the steering column and wheel from the vehicle. Refer to Steering
Column Replacement.
Remove the air inlet grill panel. Refer to Air Inlet Grille Panel Replacem ...
Cylinder Head Installation
Special Tools
EN-45059 Torque Angle Sensor Kit
For equivalent regional tools, refer to Special Tools.
Clean the sealing surfaces.
Inspect for plane surface.
Cylinder block, cylinder head
Straight-edge, feeler gauge
Install the cylinder head gasket.
Install the cylinder head. ...
Thrust Washer and Bearing Cleaning and Inspection
Warning: Wear safety glasses to avoid injury when using compressed
air or any cleaning solvent. Bodily injury may occur if fumes are inhaled
or if skin is exposed to chemicals.
Caution: Do not allow the bearings to spin. Turn them slowly by
hand. Spinning the beari ...

0.0056