Chevrolet Sonic Repair Manual: Wheel Drive Shaft Inner Joint Inspection
- Inspection Procedure
-
- Remove the front wheel drive shaft inner joint and boot. Refer to Front Wheel Drive Shaft Replacement.
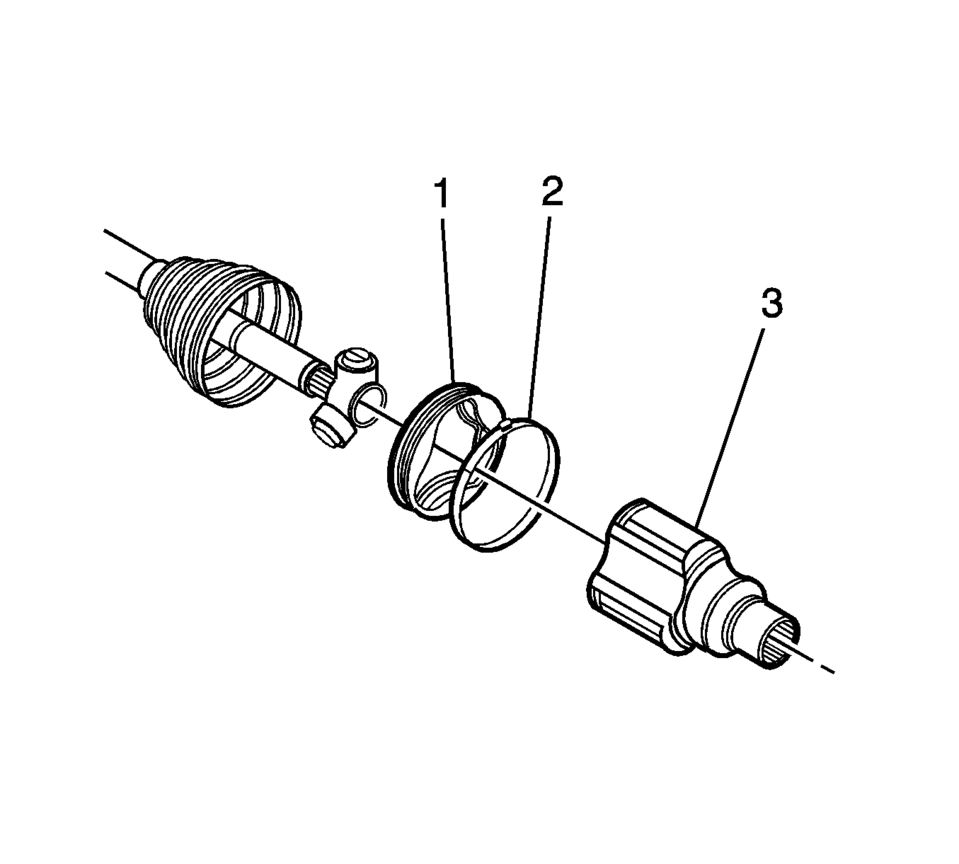
- Remove the wheel drive shaft tripod bushing (1) from the tripod housing (3).
- Remove the wheel drive shaft tripod housing (3) from the wheel drive shaft.
- Remove the wheel drive shaft tripod joint boot bushing (1).
- Using a suitable cleaner, remove the excess grease from the tripod assembly.
- Inspect the following items for damage or excessive wear:
- The wheel drive shaft tripod boot
- The wheel drive shaft tripod assembly
- The wheel drive shaft tripod joint housing
- The wheel drive shaft tripod joint bushing
- The wheel drive shaft
- If any of the internal parts are found to be excessively worn or damaged, replace the wheel drive shaft inner joint and boot. Refer to Front Wheel Drive Shaft Inner Joint and Boot Replacement.
 Wheel Alignment Measurement
Steering and vibration complaints are not always the result of improper alignment.
One possible cause is wheel and tire imbalance. Another possibility is tire lead
due to worn or improperly manufa ...
 Wheel Drive Shaft Outer Joint Inspection
Disassembly Procedure
Remove the outer constant velocity (CV) joint and boot from the wheel
drive shaft. Refer to Front Wheel Drive Shaft Outer Joint and Boot Replacement.
Remo ...
Other materials:
Seat Adjustment
Manual Seats
Warning
You can lose control of the vehicle if you try to adjust a driver seat while
the vehicle is moving. Adjust the driver seat only when the vehicle is not moving.
To adjust a manual seat:
1. Pull the handle at the front of the seat.
2. Slide the seat to the desired positio ...
Rear Brake Hose Replacement (Body to Axle - Disc Brake)
Removal Procedure
Warning: Refer to Brake Dust Warning.
Warning: Refer to Brake Fluid Irritant Warning.
Raise and support the vehicle. Refer to Lifting and Jacking the Vehicle.
Remove the tire and wheel assembly. Refer to Tire and Wheel Removal
and Install ...
Intelligent Key operation
Example
Example
The Nissan Armada Intelligent Key system allows seamless locking and unlocking
of doors without removing the key from your pocket or bag, enhancing both convenience
and everyday usability.
When carrying the Nissan Armada Intelligent Key within the operating range, you ...

0.0076