Chevrolet Sonic Repair Manual: Shock Absorber Disposal
Warning:
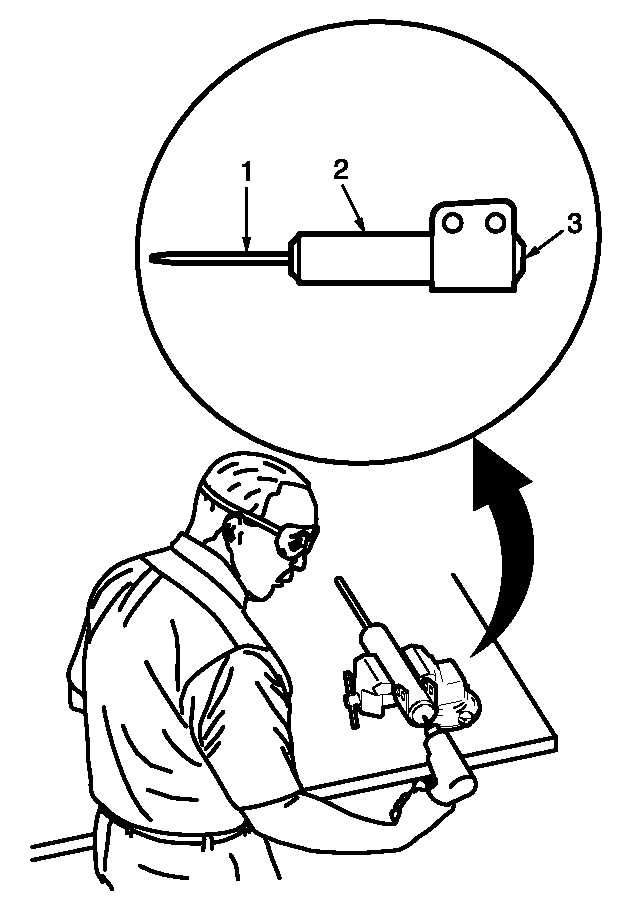
Use the proper eye protection when drilling to prevent metal chips from causing physical injury.
- Clamp the strut in a vise horizontally with the rod (1) completely extended.
- Drill a hole in the strut at the center of the end cap (3) using a 5 mm (3/16 in) drill bit. Gas or a gas/oil mixture will exhaust when the drill bit penetrates the strut. Use shop towels in order to contain the escaping oil.
- Remove the strut from the vise.
- Hold the strut over a drain pan vertically with the hole down.
- Move the rod (1) in and out of the tube (2) to completely drain the oil from the strut.
 Strut, Strut Component, or Spring Replacement
Disassembly Procedure
Remove the strut assembly from the vehicle. Refer to Strut Assembly
Removal and Installation.
Note: The spring is compressed when the strut move ...
 Shock Absorber Replacement
Shock Absorber Replacement
Callout
Component Name
Preliminary Procedure
Raise and support the vehicle. Refer to Lifting and Jacking ...
Other materials:
Shoulder Belt Height Adjuster
The vehicle has a shoulder belt height adjuster for the driver and right front
passenger seating positions.
Adjust the height so the shoulder portion of the belt is on the shoulder and
not falling off of it. The belt should be close to, but not contacting, the neck.
Improper shoulder belt hei ...
Rear Brake Caliper Replacement
Removal Procedure
Warning: Refer to Brake Dust Warning.
Warning: Refer to Brake Fluid Irritant Warning.
Raise and support the vehicle. Refer to Lifting and Jacking the Vehicle.
Remove the tire and wheel assembly. Refer to Tire and Wheel Removal
and Install ...
File menu
The file menu in the Nissan Armada driving recorder system allows users to conveniently
manage all recorded content, including photos and video files. Through this interface,
you can view, organize, and delete stored media directly from the touchscreen display,
making it easy to maintain stora ...

0.0062