Chevrolet Sonic Repair Manual: Strut and Shock Absorber Inspection (Shock Absorber)
Note:
The shock absorber assembly DOES NOT have to be removed from the vehicle to perform the following inspection procedure.
Note:
A light film of oil on the top portion of the lower shock absorber tube is normal. DO NOT replace the shock absorber for this condition.
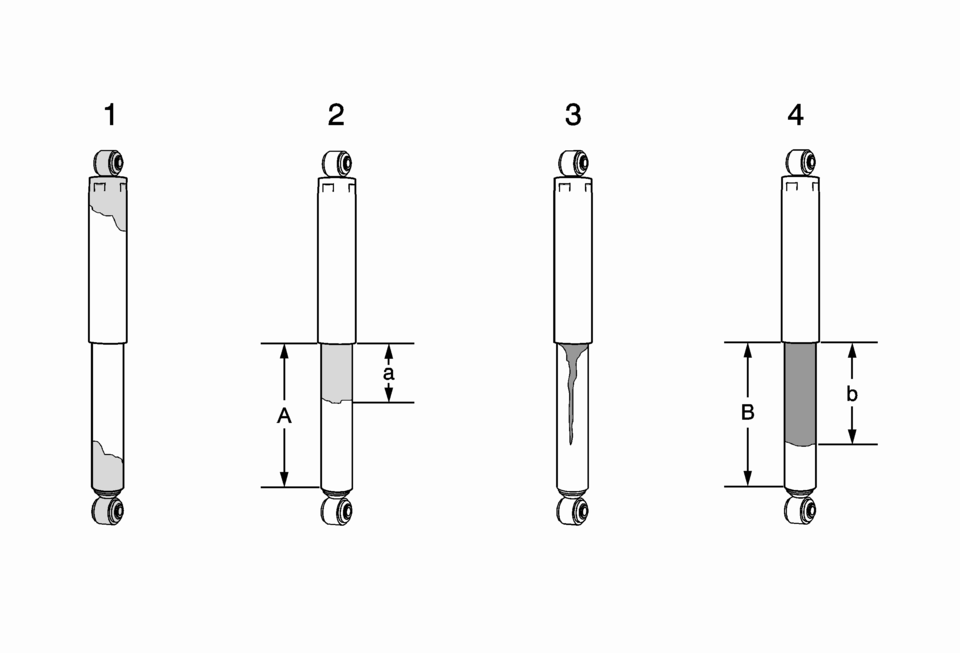
Condition 1
Oil or fluid residue only on the bottom or top of the shock absorber and not originating from the shaft seal, is not a shock absorber related problem. DO NOT replace the shock absorber, look for other external leaks.
Condition 2
Light film/residue on approximately 1/3 (a) or less of the lower shock tube (A) and originating from the shaft seal, is a NORMAL condition. DO NOT replace the shock absorber.
Condition 3
Oil drip or trail down the lower shock tube and originating from the shaft seal, is an ABNORMAL condition. Replace the shock absorber.
Condition 4
An extreme wet film of oil covering more than 1/3 (b) of the lower shock tube and originating from the shaft seal (B), is an ABNORMAL condition. Replace the shock absorber. Refer to Shock Absorber Replacement.
Inspection- Verify the customer's concern is present. If the concern is present, continue to the next step. If the concern is not present, then the vehicle is operating normally.
- Raise and support the vehicle. Refer to Lifting and Jacking the Vehicle.
- Visually inspect each of the shock absorbers for external fluid leaks. Refer to the following conditions 1, 2 , 3 , and 4 for visual inspection.
Note:
The shock absorber assembly DOES NOT have to be removed from the vehicle to perform the following inspection procedure.
- If conditions 1 or 2 are found, continue to step 4.
- If conditions 3 or 4 are found, replace shock absorber. Refer to Shock Absorber Replacement.
 Strut and Shock Absorber Inspection
Note: The strut assembly DOES NOT have to be removed from the vehicle
to perform the following inspection procedure.
Note: A light film of oil on the top portion of the strut is normal.
...
 Rear Spring, Insulator, and Jounce Bumper Replacement
Rear Spring, Insulator, and Jounce Bumper Replacement
Callout
Component Name
Preliminary Procedure
Raise and support the vehicl ...
Other materials:
Disarming the System
To disarm the system, either unlock the doors using the RKE transmitter, or start
the vehicle with a recognized transmitter in the vehicle.
To avoid setting off the alarm by accident:
Press on the RKE transmitter.
Start the vehicle.
To avoid setting off the alarm by accident:
Lock t ...
Brake Pedal Position Sensor Calibration
Calibration Criteria
Note: Do not apply the brake pedal during the brake pedal position
sensor calibration procedure. Any movement of the brake pedal during this
procedure will cause the calibration procedure to fail. If this occurs,
the brake pedal position sensor calibrati ...
Special Tools
Illustration
Tool Number/ Description
EN-45059
J-45059
Angle Meter
...

0.0051