Chevrolet Sonic Repair Manual: Thrust Angles Description
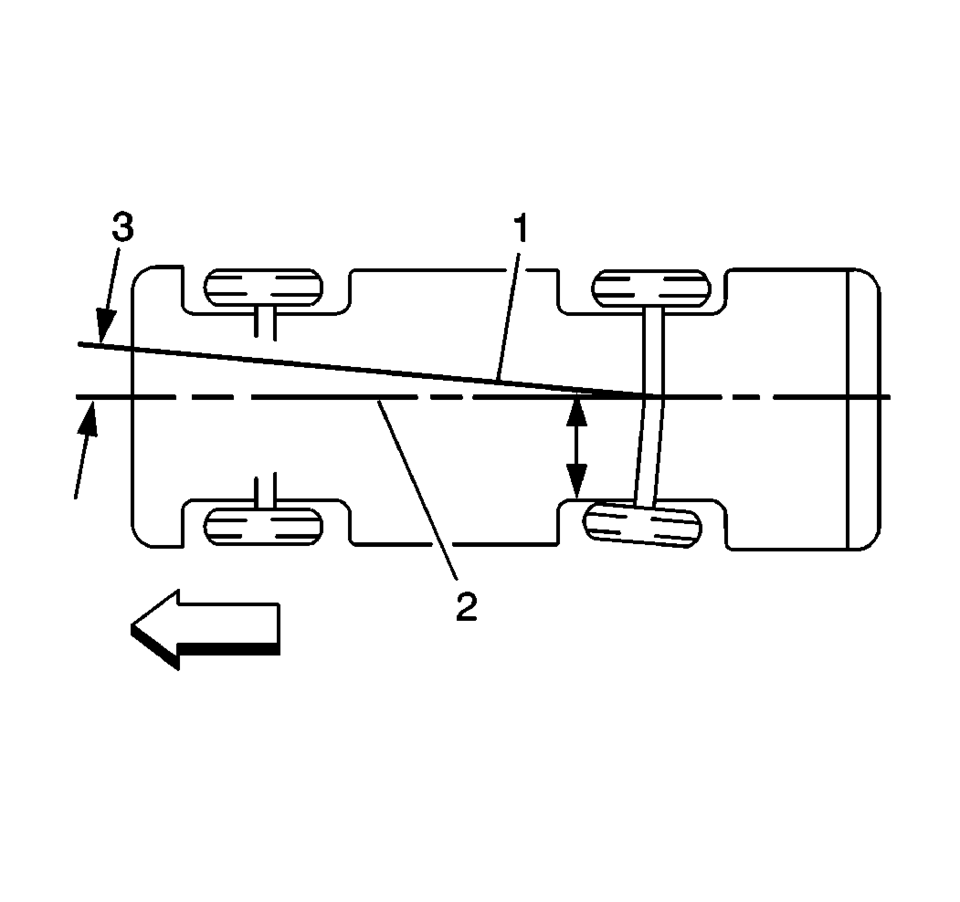
The front wheels aim or steer the vehicle. The rear wheels control tracking. This tracking action relates to the thrust angle (3). The thrust angle is the path that the rear wheels take. Ideally, the thrust angle is geometrically aligned with the body centerline (2).
In the illustration, toe-in is shown on the left rear wheel, moving the thrust line (1) off center. The resulting deviation from the centerline is the thrust angle.
If the thrust angle is not set properly the vehicle may “dog track”, the steering wheel may not be centered or it could be perceived as a bent axle. Thrust angle can be checked during a wheel alignment.
Positive thrust angle means the thrust line is pointing to the right hand side (RHS) of the vehicle.
Negative thrust angle means the thrust line is pointing to the left hand side (LHS) of the vehicle.
If the thrust angle is out of specification, moving the axle to body relationship will change the thrust angle reading.
If the vehicle is out in the Positive (+) direction-moving the RHS forward and/or LHS rearward will move the thrust angle towards zero degrees.
If the vehicle is out in the Negative (−) direction-moving the RHS rearward and/or LHS forward will move the thrust angle towards zero degrees.
 Steel Wheel Repair Description
Caution: Do not heat wheels in an attempt to soften them for straightening
or repair damage from striking curbs, etc. Do not weld wheels. The alloy used
in these wheels is heat-treated and un ...
 Tire Dismounting and Mounting
Caution: Use a tire changing machine in order to dismount tires. Do
not use hand tools or tire irons alone in order to remove the tire from the
wheel. Damage to the tire beads or the wheel ri ...
Other materials:
Vehicle Personalization
Personalization Menu (Radio without Touchscreen)
Use the audio system controls to access the personalization menus for customizing
vehicle features.
The following are all possible personalization features. Depending on the
vehicle, some may not be available.
CONFIG (Configur ...
Cooling Fan Description and Operation (LWE, LUW)
System Overview
The engine cooling fan system is composed of one cooling fan, 2 relays, the engine
control module (ECM), and the associated wiring. The cooling fan assembly includes
1 resistor mounted in the cooling fan shroud. The cooling fan resistor may be a
stand alone compon ...
Brake assist
Brake assist
The Brake Assist system in the Nissan Armada is designed to enhance braking performance
during emergency situations. When the system detects that the driver is applying
the brake pedal with significant force, it automatically increases braking pressure
beyond what a conventional ...

0.0086